Tutorial: using the RaspiCam on a Raspberry Pi 4 for computer vision, compiling with Cinder & OpenCV
Why use a Pi board, for something that could easily run on a Mac mini with a lot less hassle? Raspberry Pi's are much cheaper, much lighter, much smaller, much less energy-consuming, all things that make them the platform of choice for interactive installations when their processing power will be enough… and OpenGL ES3 will do what you need it to do.
On Github
Changelog
Latest changes pushed on jan. 2024
✅ ready to publishHow-to
This tutorial is based on the open-sourced art work Extension du Vide developed for French artist Marie-Julie Bourgeois.
Why go into such a hassle when Mac mini's do a perfect job?
Why a Pi?
Why use a Pi board, for something that could easily run on a Mac mini with a lot less hassle? Raspberry Pi's are much cheaper, much lighter, much smaller, much less energy-consuming, all things that make them the platform of choice for interactive installations when their processing power will be enough… and OpenGL ES3 will do what you need it to do.
Then why a RaspiCam?
The Raspberry Pi built-in camera interface is efficient, well documented and avoids the USB bus which is a plus on the hardware level of things as well as on the software side of things.
Limitations!
When speaking of OpenGL ES3, do keep in mind that it bears limits, compared with the standard version. Make sure you read through the limitations before you embark on a "Pi-OpenGL" journey. And be sure to check out what can be done with shaders — limited to their V100 brew as well.
Required devices
a "Pi" board: Raspberry Pi 4 Model B (with at least 4Gb of RAM)
a micro SD card of 8Gb minimum
a power outlet for the Raspberry Pi
a "RaspiCam", preferably infrared-enhanced because they work better in low light conditions: Raspberry Pi Camera Module 2 NoIR
a video projector with a resolution of at least 1024 × 576px
Raspbian OS setup
Start by installing Raspbian OS in its Buster flavor (version 10) and not in its latest release. Follow the link: https://www.raspberrypi.com/software/ to download the "Raspberry Pi Imager". When selecting the right version, obviously prefer the GUI-enabled version, you'll need to be able display something in the end.
Then update & upgrade packages with the apt-get command:
sudo apt-get update
sudo apt-get upgrade
OpenCV 3.2 install
sudo apt-get install libopencv-dev
OpenCV must be installed in version 3.2.0 for this program: don't try and install the latest!
That's all there is to it: if this works fine then you've got OpenCV running on your machine, almost for free. Yay.
RaspiCam setup
What's called a RaspiCam is a webcam that uses the special camera interface on the Pi board. It's a very appropriate kind of device when you need to create a Computer Vision enabled installation with the Pi.
Plug & play
image from Camera setup on Raspberry Pi 4
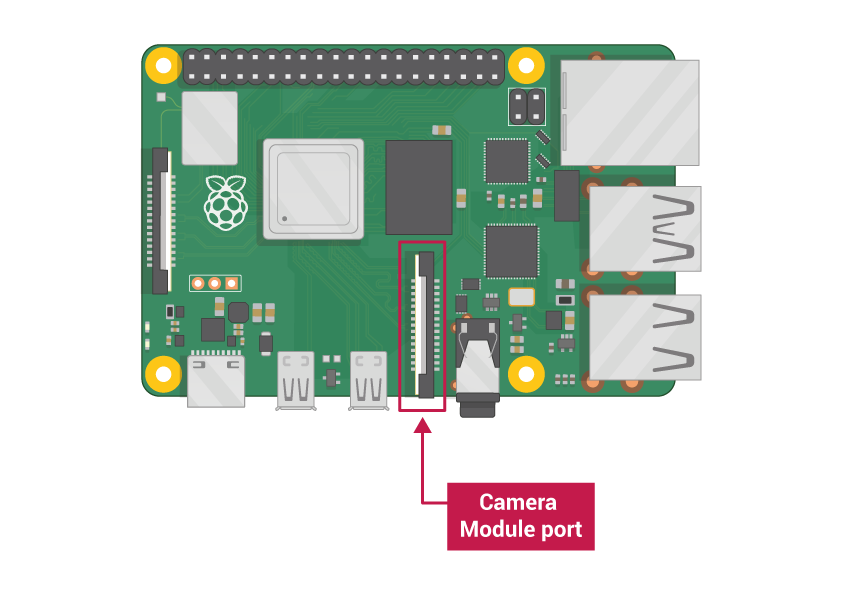
Start by allowing the use of the special camera interface on the Pi. To do so via the Terminal, type sudo raspi-config and then choose Interfaces, Camera, and say that you want it enabled. Via the GUI open the raspberry menu, choose Preferences, Interfaces, Camera and click on the "enabled" radio button. You will need to sudo reboot in order for these changes to take effect.
If you want to learn more about the official Pi camera and its use, follow the official RaspiCam guide.
Use with C++
A research group specialized in AI and computer vision has created a very neat library that lets us use the RaspiCam in a C++ project, with or without involving OpenCV.
Start by installing Cmake with sudo apt-get install cmake.
Start by downloading the code that you will need to compile from their SourceForge repository.
Unzip that file to a folder in your Pi's Documents folder (well that's actually up to you), fire up a Terminal window, navigate to that newly created folder with cd ~/Documents/your_complicated_path_to_raspicam and then mkdir build && cd build && cmake ...
If that all worked, you're ready to compile the raspicam lib. Go for it:
make
sudo make install
sudo ldconfig
Finally, update the lib path:
export LIBRARY_PATH=/opt/vc/lib
Please note that to simply run an app that was previously compiled on a specific Pi (i.e. your dev Pi) and copy-pasted to a new Pi (i.e. your target, production Pi), that’s all that needs to be installed on that new Pi.
Jump to the App autostart section below to keep going after copying your app folder on the production Pi's desktop.
Cinder
Cinder is a creative coding framework made in C++: it does what Processing does, but faster and using less resources. It is similar to OpenFrameworks, but better consolidated and packaged, more professional.
Installing Cinder on the Pi
Let's not get into the details of what line comes from what comment, but the following apt-get installs, target details and cmake file updates come from these four links:
Let's start by installing cmake:
sudo apt-get install cmake
And then libs that will be linked when building Cinder:
sudo apt-get install libxcursor-dev \
libgles2-mesa-dev \
zlib1g-dev \
libfontconfig1-dev \
libmpg123-dev \
libsndfile1 \
libsndfile1-dev \
libpulse-dev \
libasound2-dev \
libcurl4-gnutls-dev \
libgstreamer1.0-dev \
libgstreamer-plugins-bad1.0-dev \
libgstreamer-plugins-base1.0-dev \
gstreamer1.0-libav \
gstreamer1.0-alsa \
gstreamer1.0-pulseaudio \
gstreamer1.0-plugins-bad \
libboost-filesystem-dev
sudo apt install libxrandr-dev \
libxinerama-dev \
libxi-dev
sudo apt-get install xcb libxcb-xkb-dev x11-xkb-utils libx11-xcb-dev libxkbcommon-x11-dev
sudo apt-get install libxtst-dev
You're now ready to clone Cinder and build it, using the right flag to only target OpenGL ES3 in order to fit with the Pi:
git clone --recursive https://github.com/cinder/Cinder.git
cd Cinder
mkdir build && cd build
cmake .. -DCINDER_TARGET_GL=es3-rpi
make -j 3
You're done compiling Cinder? Time to use it. Let' head to the /samples.
In order to compile the samples without a system path error, change line 136 in the proj/cmake/modules/cinderMakeApp.cmake file by adding the -lstdc++fs flag to notify the Linker it should use that file system lib:
target_link_libraries( ${ARG_APP_NAME} PUBLIC cinder ${ARG_LIBRARIES} -lstdc++fs )
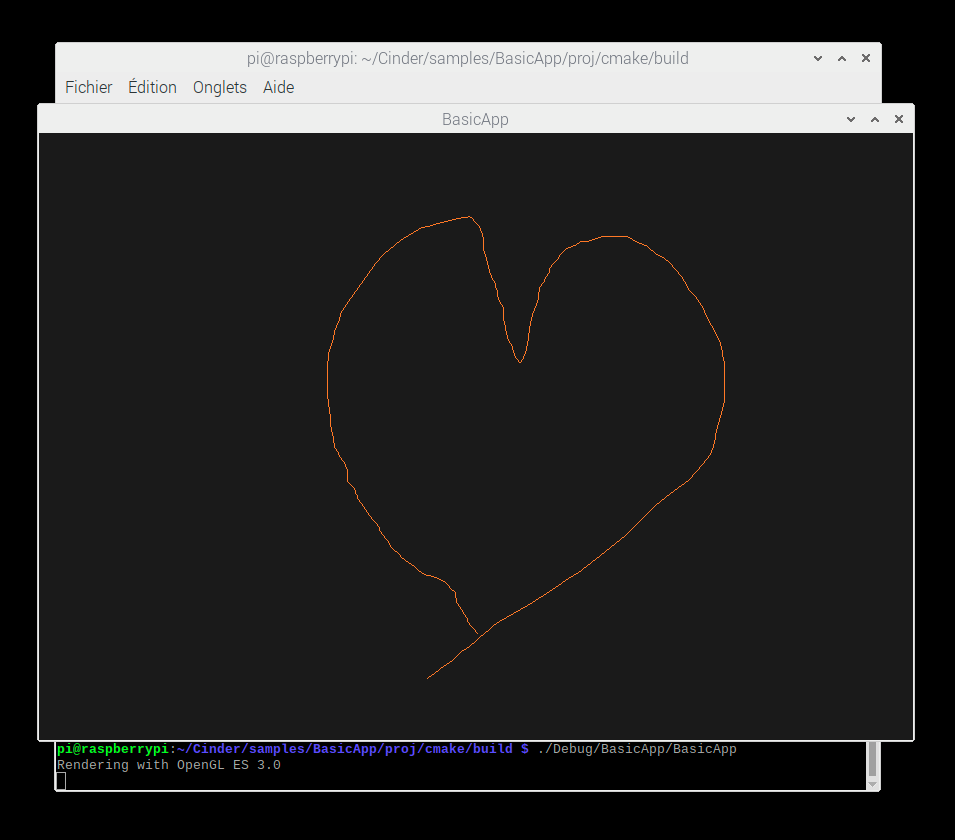
As of now, Cinder's samples should compile: try the Cinder/samples/BasicApp using its CMake setup:
cd Cinder/samples/BasicApp/proj/cmake && mkdir build && cd build
cmake .. -DCINDER_TARGET_GL=es3-rpi
make
./Debug/BasicApp/BasicApp
Got a window where you can draw with your mouse? It works!
Using OpenCV and a RaspiCam from within a Cinder-based app
The CMake side of things
Easiest way to start a Cinder project on Raspbian Linux is to duplicate the Cinder/samples/BasicApp folder. Do that and name it whichever way you want (here we'll call it your_folder_name). Then CMake the project and manually add links to the compilation routine in order to include OpenCV and RaspiCam to the package:
mkdir build && cd buildcmake .. -DCINDER_TARGET_GL=es3-rpi
When that's done, open the your_folder_name/proj/cmake/build/CMakeFiles/BasicApp.dir/link.txt file and at the end of the line, after -ldl -lpthread :
add the following links: -lraspicam -lraspicam_cv -lopencv_core -lopencv_imgcodecs -lopencv_imgproc
Then:
make && ./Debug/BasicApp/BasicApp
It works again! Definitely give yourself a high five or even a hug.
The OpenCV side of things
In order to be able to use the cv::Mat images produced by OpenCV from within a Cinder app, you need to snatch the Cinder method fromOcv() and its encapsulating class from CinderOpenCV.h:
class ImageSourceCvMat : public ImageSource {
  public:
	ImageSourceCvMat( const cv::Mat &mat )
		: ImageSource()
	{
		mWidth = mat.cols;
		mHeight = mat.rows;
		if( (mat.channels() == 3) || (mat.channels() == 4) ) {
			setColorModel( ImageIo::CM_RGB );
			if( mat.channels() == 4 )
				setChannelOrder( ImageIo::BGRA );
			else
				setChannelOrder( ImageIo::BGR );
		}
		else if( mat.channels() == 1 ) {
			setColorModel( ImageIo::CM_GRAY );
			setChannelOrder( ImageIo::Y );
		}

		switch( mat.depth() ) {
			case CV_8U: setDataType( ImageIo::UINT8 ); break;
			case CV_16U: setDataType( ImageIo::UINT16 ); break;
			case CV_32F: setDataType( ImageIo::FLOAT32 ); break;
			default:
				throw ImageIoExceptionIllegalDataType();
		}

		mRowBytes = mat.step;
		mData = reinterpret_cast<const uint8_t*>( mat.data );
	}

	void load( ImageTargetRef target ) {
		// get a pointer to the ImageSource function appropriate for handling our data configuration
		ImageSource::RowFunc func = setupRowFunc( target );

		const uint8_t *data = mData;
		for( int32_t row = 0; row < mHeight; ++row ) {
			((*this).*func)( target, row, data );
			data += mRowBytes;
		}
	}

	const uint8_t		*mData;
	int32_t				mRowBytes;
};


inline ImageSourceRef fromOcv( cv::Mat &mat )
{
	return ImageSourceRef( new ImageSourceCvMat( mat ) );
}
App autostart
To run art pieces in art spaces where you're not sitting all day to monitor power cuts, you'd better create an autostart routine. Good thing that the Pi is built for that: it doesn't have a start button, it just starts as soon as it gets the right kind of electricity flowing in it veins.
Start by installing a window controller app: sudo apt-get install wmctrl.
Then create a first shell script with nano ~/Desktop/startup.sh, type the following and save:
#!/bin/sh
echo your_folder_name
cd /home/pi/Desktop/your_folder_name
sleep 5
./BasicApp
Don't forget to make that shell script executable with sudo chmod +x ~/Desktop/startup.sh.
Create a second script with nano ~/Desktop/focus.sh, type the following and save:
#!/bin/sh
sleep 10
wmctrl -R BasicApp
Again, make that executable with sudo chmod +x ~/Desktop/focus.sh.
Finally create/open the autostart routine file with sudo nano /etc/xdg/lxsession/LXDE-pi/autostart and type and save:
@lxpanel —profile LXDE-pi
@pxmanfm —desktop —profile LXDE-pi
@xscreensaver -no-splash
/home/pi/Desktop/startup.sh
/home/pi/Desktop/focus.sh
You're all set, ready to sudo reboot and give it a shot.
Post scriptum: again, if you're planning on "permanently" running your app on a different Pi than your dev Pi (i.e. a production Pi) make sure to copy-paste the compiled BasicApp and copy-paste the resources folder and the assets folder right besides that compiled BasicApp. Once pasted on the new Pi, make the BasicApp executable with sudo chmod +x ~/Desktop/your_folder_name/BasicApp.